
- Information
- Products
- Pond Construction
- Koi Info
- Pond Info
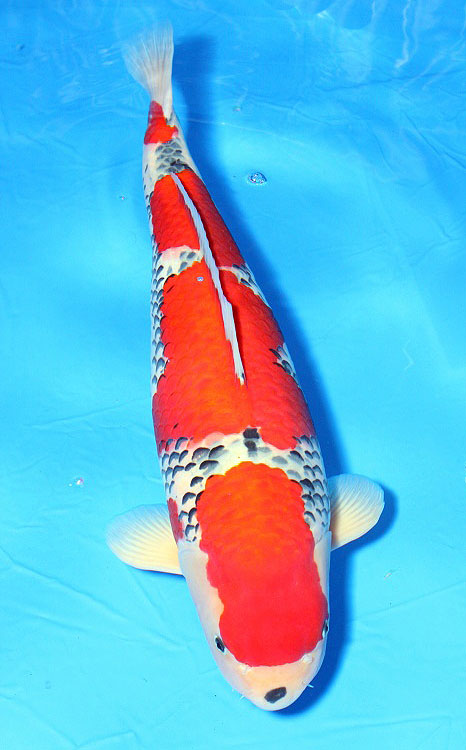
- Portfolio
- Portfolio Introduction
- Portfolio I
- Portfolio II
- Portfolio III
- Portfolio IV
- Portfolio V
- Portfolio VI
- Portfolio VII
- Porfolio VIII
- Porfolio IX
- Portfolio X
- Porfolio XI
- Porfolio XII
- Portfolio XIII
- Porfolio XIV
- Portfolio XV
- Portfolio XVI
- Portfolio XVII
- Portfolio XVIII
- Portfolio XIX
- Portfolio XX
- Portfolio XXI
- Interest
koi photography
Taking striking koi pictures doesn't happen by accident. There are many factors involved and taking all of them into consideration will allow you to produce a superior result
Camera Settings Summary
- DSLR on manual
- Fast "L' caliber lense
- shoot in RAW
- 1/250th shutter speed [MSS]
- F4 / 5.6 Aperture
- Evaluative metering
- ISO 200 [native]
- 3 fps. burst mode
- AI servo back button focus
- Joystick select Focus pts.
- Custom Gray Card WB
- Good Flash [ie 580 exII]
- Flash set on "Evaluative"
- Flash bracket w/diffuser
- Circular Polarizer
photographing koi
Until you've tried to capture an image yourself, there is a not a lot of appreciation for a good koi photograph. For the fish yes, for the effort and technical merits of the photo, no. Koi are reticent to pose and in fact, often seem to avoid the camera. A lot of patience is required just to wait for the fish to be in position and have its fins displayed just so. Even lighting is key and a polarizer is a no brainier. A flash can help minimize glare tooBubblers and surface debris quickly ruin whatever composition you have captured so these need to be dealt with. Portrait orientation is the only way to shoot, and having the fish at a slight angle through the image delivers a more aesthetic shot. Unless you are fortunate, just getting a half way decent shot could take 10 minutes of standing and shooting - patience is key


Camera Selection
Any DSLR with manual control + interchangeable lenses [My Camera is a Canon 50D] will provide you with a capable tool. Of course, like any tool, it takes study and practice to become skilled with its use. Cameras from Canon and Nikon are industry leaders, but Sony, Olympus and Minolta among others also produce great gear
Most cameras sold are "crop cameras" which simply means they have a smaller than the standard 24 x 36mm full frame image sensor. Full Frame cameras are preferred, but come at a higher price. They provide thinner DOF [depth of field} and much better noise handling when shooting at high ISO settings. For typical koi photography, FF cameras aren't necessary but become advantageous for dimmer indoor shoots
Camera Settings
Shooting in manual or aperture priority is recommended. You can meter from a gray card or any other ambient mid tone to get an idea of your exposure. Use your histogram and try to expose to the right. Take a picture of the gray card and set your custom white balance if possible or use the photo to correct in post. If that is your plan, set WB to autoEvaluative Metering gives a pretty good balanced exposure. If you set your ISO to its native setting - that will provide the best dynamic range and the least amount of noise. With the 50D, the native ISO is 200. Every other ISO setting is a result of the cpu in the camera pushing or pulling the numbers. However, you want this setting to produce perhaps a -1 to -2 stops EV [below a good exposure]. Your flash will not be overly taxed and perform better. If it has to make up too much light, then you may not be able to fire a burst of fill flash photo's at that opportune moment
Sometimes shooting fish with spot metering can create more pop by darkening the surrounding water - but you can also blow out the shot if you meter off the wrong point [only 3% of the image for the 50D at the focus point with spot metering]
Separate your focus from your shutter. This is referred to as back button focus. I will usually ride the focus button in AI Servo as the fish is swimming towards me with a bottom single focus point selected. Fire a burst of 3 shoots if possible. If you try too many shots, [6.3 fps with the 50D] your flash won't keep up unless you use an external flash battery pack. I'm considering one of these, I missed a good shot of the All Japan Grand Champion in 2010 because the flash did not fire on my second shot
The histogram is a very good tool to ensure good exposure and dynamic range. Dark colours are represented on the left side, mid tones in the middle and highlights to the right. The height signifies the amplitude. If the luminosity graph was to go past the right side border, the photograph would be overexposed. In general, a nice wide graphical display, exposed to the right, is desired but it depends on the subject of course
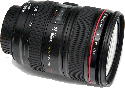
Lense Selection
Canon 24-105mm IS F4L OR 24-70mm F2.8L OR Prime Lens 35mm + 50mm + 85mm
A Canon L series lens will provide excellent contrast and sharpness even when shooting wide open. Cheaper lenses will suffer sharpness loss, distortion and other defects until stopped down to higher apertures [ie F7.1]. Remember, glass is everything and in my opinion buying cheap lenses is a real waste of money. Cameras come and go, but a good lense can last a lifetimeZoom lenses are a better option when shooting different sized fish, however no zoom lens can match a good prime lense for sharpness. I would try shots with several lenses and decide which gives you the best results. You may also want
What is a higher shutter speed ? The recommended shutter speed for hand holding is the reciprocal of the focal length. Then you want to take in account your crop factor if using a crop camera. Then add a 1.5x the recommended shutter speed to that figure. If your real world shutter speed eclipses the recommended, then turn of IS.
ie. Shooting at 100mm focal length with a 1.6x crop camera [ie. 40, 50d, 7d etc]. The effective mm is 1.6 x 100 = 160mm. Multiply this by 1.5x for an extra margin = 240mm. The reciprocal of that is 1/240. If you are shooting over 240, ie 1/250th of a second or higher, turn off your IS
Flash & Diffuser
Flash set to ETTL w/metering on Evaluative, FEC +1 or 2 ?
Explanation Fill flash is key. Set your flash to ETTL if available. [Evaluative through the lense]. TTL will also work. Look up in your camera manual to find the highest shutter speed sync [MSS - max speed sync]. This is generally 1/200th or 1/250th. of a secondAlso set your flash metering [separate from your cameras] located in your menu under flash settings to "Evaluative". This generally works better for outdoor, fill flash type photography as opposed to "Average". Disable high speed sync on your flash. HSS allows for the flash to fire at higher shutter speeds ie. 1/2000th. by sending out a series of pulses. This is necessary to illuminate the entire frame properly [curtain is never fully open but slides] at the expense of quicker battery depletion and less single burst output power [2-3 stops lost]
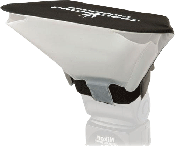
A diffuser helps in reducing shadows and softening by spreading the light. The bigger the better, I have a couple different lumiquest models which work well. Outdoor fill flash photo's should not look like a flash has been fired at all. Rechargeable battery recommendations include Maha and Sanyo Eneloop and these dramatically outperform alkaline batteries
I use the Lumiquest Softbox III which is 8 x 9 inches [still portable in a bag] and has about 2 stops of light lost
Flash Bracket
Custom Brackets, Justrite at the high end. Stroboframe Camera Flip - entry level
Explanation Koi are typically shot with the camera in a portrait orientation [turned sideways]. This puts your on camera flash to one side. In this position, uneven lighting will fall on the koi. Fill flash is really key and on camera flashes are poor so buy a good dedicated flash. They minimize surface glare and allow you to use all the recommended settings without compromise. It also places some nice highlights on your subjects [ie. catch light in the eyes]A camera flip style bracket [there are flash flip models available which I think are more awkward] allows quick and smooth rotation of the camera while maintaining the flash in a above camera, stationary position. A good bracket will cost about $400. I have a custom brackets digital pro, and you want to get all the quick releases that are available
Lense Settings
Aperture of F4 to F 5.6, IS on if available, Focal Length 25 - 100mm
With Koi photography, lenses are generally set at F4 or F5.6. This is necessary to produce the DOF required to get the whole fish in focus. For example, at approximately 6 feet away from the koi, with your lense set at 50mm, [crop camera 1.6 = 80mm effective focal length] the depth of field is almost 12 inches. With fish smaller than 10" you will have to zoom in further to avoid heavy cropping thus reducing DOF even further
At f 2.8, DOF is reduced to about 5.5 inches. Super fast prime lenses have their place for more artistic photo's. I have they coveted 35mm 1.4 L which is sharp wide open and provides great bokeh [creamy out of focus backgrounds]. These shots are fun, but koi photo's are generally provided to allow for evaluation of the fish, hence a completely sharp photo is desired
The picture right illustrates that with a 2.8 aperture value, the tail tube is out of focus due to the lack of depth of field. This pic was shot with the Sigma 50mm 1.4, a very nice bokeh lense
Circular Polarizer
Invest in B&W, Rodenstock, avoid cheap filters - expect to pay $90 or more. Polarizers cut reflections and haze and are essential to shooting koi. They also accentuate colours. They allow you to see the fish much more clearly in the water but this comes at the cost of losing 1.5 - 2 stops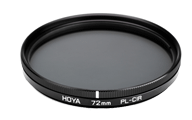
The stops penalty is such that if you have a perfect exposure with camera settings of F4, 1/200th and iso 400, with the addition of a polarizer [and loss of 2 stops] then 1 or 2 of those settings need to change to compensate. ie. F4, 1/800th, iso 400 OR F5.6, 1/400th and iso 400 and so on
Finally......Taking the Shot
Patience is key. Set yourself up at a right angle to the sun if possible - this will maximize the use of your polarizer. Turn your polarizer around until you can see in the water the best. Replace the lens hood to cut flare. Remember, the polarizer is ineffectual with the sun in front or behind you. Take a couple of practice shots and chimp the histogram to make sure your exposure is correct
Koi Position
You could expect to wait up to 20 mins for the best opportunity. You are waiting for the koi to be facing you, with pec fins out, straight back line nice angle of incidence and mouth closed. When that eventually comes, fire a burst of 3 shots. With a quality flash, batteries charged and being not too far off exposure without flash, then your flash should fire 3 times. Remember, the fish is not going to pose for you, so firing 3 shots in 1 second will maximize your chances to get a properly exposed and sharp image. You may also want to try so FEC [flash exposure compensation] bracketing as blown out shots are not recoverable like underexposed ones. I have the canon 580exII which classically underexposes
Other Settings to try
To get some interesting shots, say of a koi harvest or such, you can try the following settings and techniques.
Adding some dutch [camera tilt] gives a sense of action. Shooting at lower f-stops increases background blur and really isolates and punches your subject. The Canon 135mm has some magic bokeh and looks great shot wide open. You could try it at F2.8 for a slightly larger DOF and a little bit more sharpness
Set your shutter speed up to 1/1000 or more and you can get some very sharp stop action shots. Don't forget to set your flash to high speed sync or it will your shutter speed will drop back to 1/250 or 1/200 [whatever your cameras MSS spec is]
Taking it further, increasing the shutter to 1/4000 will rely on the flash for most of its light and really darken the background because of flash range and inadequate time to get a background exposed. [read more: 1st curtain / 2nd curtain flash and dragging the shutter]
The last time I was at Ray Abels Koi Harvest in 2008 I came away with some nice shots. However, upon reflection, I started to feel that they were all the same. That wasn't the case, exactly, but there weren't enough different or interesting pics that had a wow factor. I plan to shoot a lot with my 135mm next time, as well as switch up some angles, try some different shutter speeds and get more creative
post production
Shooting in RAW allows you a great amount of control in post. It is akin to a digital negative. For Canon cameras, the consensus is that Canon's Digital Photo Professional will get you the best result from their raw images. Create a 16bit Tiff file. Photoshop is also a very popular tool for touching up and improving your pics
This doitsu shows was my favourite fish at the 41st. All Japan Koi Show. Because the fish was overhead, I had a great angle [maybe a little too overhead] but some flash reflection as well as some reflection from the overhead lights. Using the clone tool allowed me to remove the light flares that exist. There is one in the actual vat, another on the shoulder sumi [no so obvious] and the third on the second plate of beni
An obvious choice for white balance was the white skin. Of course this can be taken too far, rendering a koi that looks so surreal that everyone knows it's fake. In fact, the shiroji on the original photo looks better but may not be accurate. To really get a handle on post production requires a lot of reading and practice, I have a long way to go in that realm as well
Shooting in RAW allows you a great amount of control in post. It is akin to a digital negative. For Canon cameras, the consensus is that Canon's Digital Photo Professional will get you the best result from their raw images. Create a 16bit Tiff file. Photoshop is also a very popular tool for touching up and improving your pics


This doitsu shows was my favourite fish at the 41st. All Japan Koi Show. Because the fish was overhead, I had a great angle [maybe a little too overhead] but some flash reflection as well as some reflection from the overhead lights. Using the clone tool allowed me to remove the light flares that exist. There is one in the actual vat, another on the shoulder sumi [no so obvious] and the third on the second plate of beni
An obvious choice for white balance was the white skin. Of course this can be taken too far, rendering a koi that looks so surreal that everyone knows it's fake. In fact, the shiroji on the original photo looks better but may not be accurate. To really get a handle on post production requires a lot of reading and practice, I have a long way to go in that realm as well